Bake your way to sandwich perfection with the art of making Turkish bread, a game-changer for your lunchtime cravings.
 Add to Recipe Book
If you've ever craved the perfect vessel for your favorite sandwich fillings, mastering the art of making Turkish bread might just be the answer you've been looking for. The process of creating this pillowy yet sturdy bread involves a few key steps that elevate the humble sandwich experience to a whole new level. From the initial mixing of ingredients to the final golden-brown crust, each stage contributes to the unique flavor and texture that sets Turkish bread apart. So, why not take a closer look at the intricacies of crafting this versatile bread that will unquestionably elevate your sandwich game?
Ingredients Needed
To create delicious Turkish bread for sandwiches, gather the following ingredients. You'll need bread flour, which is essential for achieving the perfect texture and structure of the bread. The yeast is another vital component that will help the bread rise and develop those airy pockets that are characteristic of Turkish bread.
When it comes to baking techniques, it's important to make sure that your yeast is activated properly before incorporating it into the flour. This will guarantee a good rise and a light, fluffy texture in your bread. Kneading the dough thoroughly is also key to developing the gluten network that will give your Turkish bread its characteristic chewiness.
As you gather your ingredients, consider the sandwich fillings you plan to use with your Turkish bread. Whether you opt for classic combinations like falafel with tahini sauce or grilled vegetables with hummus, the versatility of Turkish bread makes it the perfect canvas for a variety of flavors. The slightly chewy crust and soft interior of the bread will complement both hearty and light fillings, making it a great choice for any sandwich creation.
Mixing the Dough
Begin by combining the activated yeast mixture with the bread flour in a large mixing bowl. As you mix these ingredients together, focus on achieving a smooth and consistent dough texture. The key to successful mixing lies in the techniques you employ.
To ensure a uniform distribution of the yeast throughout the flour, use a gentle folding motion to incorporate the wet and dry ingredients. Avoid overmixing, as this can lead to a tough bread texture. Pay close attention to the dough's texture; it should be slightly tacky but not overly sticky. Adjust by adding more flour if it feels too wet or a touch of water if it's too dry.
When mixing, keep in mind that the goal is to develop gluten strands that will give your Turkish bread its characteristic chewiness and structure. Use a gentle kneading motion to encourage gluten formation without overworking the dough.
If you're using a stand mixer with a dough hook attachment, let it work the dough on a low speed for about 8-10 minutes until it's smooth and elastic.
Kneading and Resting
Consider the importance of kneading and resting in the process of making Turkish bread for sandwiches. Achieving the perfect texture and flavor relies heavily on these essential steps. Here's what you need to keep in mind:
- Flour Consistency: Ensuring the right consistency of flour is key to a successful dough. Too much flour can result in a dense bread, while too little can make it too sticky to work with. Finding the balance is crucial for the desired outcome.
- Yeast Activation: Properly activating the yeast is essential for the dough to rise. Make sure the water temperature is just right to activate the yeast effectively. This step sets the foundation for a light and airy bread.
- Dough Elasticity and Proofing Time: Kneading the dough until it reaches the right elasticity is essential. This process develops the gluten, which gives the bread structure and texture. Allowing the dough to rest for the correct amount of time during proofing is equally important. This step allows the flavors to develop and the dough to rise properly.
Mastering the art of kneading and resting will elevate your Turkish bread sandwiches to a whole new level, ensuring a delightful eating experience for you and your guests.
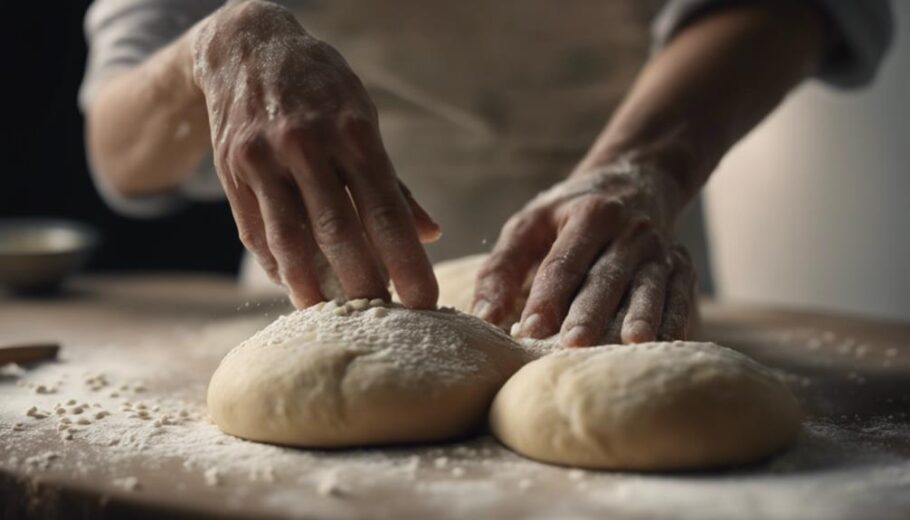
Shaping the Loaves
Achieving the perfect shape for your Turkish bread loaves is an essential step in the bread-making process, ensuring a visually appealing result that complements the flavors and textures within.
When it comes to shaping the loaves, there are a few key techniques you can employ to achieve that classic Turkish bread appearance.
Start by gently punching down the dough to release any air bubbles formed during the resting period. Then, divide the dough into equal portions based on the size of loaves you desire.
Working with one portion at a time, use your hands to shape the dough into a round ball. Next, flatten the ball slightly and fold the edges towards the center, creating a smooth surface on the top.
For a traditional Turkish bread shape, gently elongate the dough into an oval or rectangle, about half an inch thick.
You can also experiment with different loaf shaping techniques to add a unique touch to your bread. Consider braiding the dough for an intricate look or forming a spiral for a visually appealing presentation.
Preparing the Oven
To guarantee ideal baking conditions for your Turkish bread loaves, preheat your oven to the specified temperature as outlined in your recipe. This step is essential to make sure that your bread bakes evenly and achieves that perfect golden crust.
Here are a few tips to help you prepare your oven for baking:
- Oven Temperature and Timing: Set your oven to the exact temperature recommended in your Turkish bread recipe. Allow the oven to heat up completely before placing the loaves inside. This ensures that the bread starts cooking immediately and rises properly, resulting in a light and airy texture.
- Baking Sheet Placement: Place your prepared Turkish bread loaves on a baking sheet lined with parchment paper. Make sure there's sufficient space between the loaves to allow for even heat distribution. Position the baking sheet in the center of the oven to guarantee that the bread bakes uniformly from all sides.
- Rotation: Halfway through the baking process, rotate the baking sheet 180 degrees. This rotation helps the bread to bake evenly, compensating for any hot spots in your oven. It guarantees that each loaf receives uniform heat exposure, resulting in consistent browning and texture throughout.
Baking the Bread
Prepare to slide your parchment-lined baking sheet with the risen Turkish bread loaves into the preheated oven, setting the stage for the transformative baking process ahead. As you carefully place the loaves in the oven, remember that the magic of baking is about to unfold, turning your risen dough into delicious Turkish bread perfect for sandwiches.
The bread rising process you meticulously followed has allowed the dough to expand and develop those desirable air pockets that give Turkish bread its characteristic light texture. This rising stage is pivotal as it allows the flavors to intensify and the gluten to strengthen, resulting in a chewy yet tender crumb.
Thanks to the yeast activation earlier in the recipe, the dough has been infused with life, causing it to rise and create that sought-after airy interior. The yeast's fermentation process not only leavens the bread but also imparts a subtle tang that enhances the overall flavor profile.
As the bread bakes in the oven, the heat will work its magic, causing the dough to rise even further and develop a beautiful golden-brown crust. The aroma of freshly baked bread will fill your kitchen, signaling that your Turkish bread is almost ready to be enjoyed in a delicious sandwich.
Stay tuned for the next step in achieving the perfect crust.
Achieving the Perfect Crust
To achieve the perfect crust on your Turkish bread, focus on texture and temperature. Consider tips for enhancing the crust's texture. Master the secrets of baking temperatures for that ideal golden-brown finish.
These elements will elevate your sandwich game to a whole new level.
Crust Texture Tips
Ever wondered how to achieve that perfect crust texture when making Turkish bread for sandwiches? The crust color and crumb structure play an essential role in creating a delightful sensory experience with each bite.
Here are some tips to help you master the art of achieving the perfect crust:
- Steam is Key: Introducing steam into the oven during the initial stages of baking helps create a moist environment, promoting crust development while keeping the crumb soft and airy.
- Temperature Control: Start baking at a high temperature to set the crust quickly and then lower the temperature to allow the crumb structure to develop fully without scorching the exterior.
- Brushing Techniques: Brushing your dough with milk, egg wash, or water before baking can significantly impact the crust texture, creating a glossy finish or a crisp exterior, depending on the desired outcome.
Baking Temperature Secrets
Achieving the perfect crust texture when making Turkish bread for sandwiches hinges greatly on understanding the baking temperature secrets that govern the process. Temperature control plays an essential role in ensuring the desired bread quality.
To achieve that crispy exterior and soft interior characteristic of Turkish bread, you need to preheat your oven adequately. Oven tricks such as using a baking stone or a cast-iron skillet can help in creating steam that aids in crust formation.
Maintaining a high temperature in the oven during the initial stages of baking is essential for that signature crunchy crust. However, be cautious not to scorch the bread; adjusting the temperature midway through baking can prevent excessive browning. This method promotes an even rise and a beautifully golden crust.
Cooling and Slicing
As you wait for your freshly baked Turkish bread to cool, the aroma wafting through your kitchen builds anticipation for the satisfying crunch of the crust.
Once cooled, mastering the art of slicing is essential for that perfect balance of soft interior and crispy exterior.
Cooling Process
After removing the Turkish bread from the oven, allow it to cool completely before slicing to safeguard the best results for your sandwiches. The cooling benefits of letting the bread rest include maintaining its structural integrity and preventing it from becoming too doughy.
Here are some tips to enhance your cooling process:
- Ventilation: Place the Turkish bread on a wire rack to secure all sides cool evenly and any residual steam can escape, keeping the crust crisp.
- Room Temperature: Avoid cooling the bread in a humid or hot environment as it can cause condensation and make the bread soggy.
- Covering: Once cooled, store the bread in a breathable container or paper bag to preserve its freshness without trapping excess moisture.
Slicing Techniques
To achieve the best results for your sandwiches, use precise slicing techniques after the Turkish bread has thoroughly cooled. When it comes to bread slicing, it's crucial to maintain consistency in the thickness of the slices. This not only guarantees an even distribution of ingredients but also enhances the overall presentation of your sandwich.
When using knife techniques for slicing Turkish bread, opt for a serrated knife to avoid crushing the delicate crumb structure. Start by gently sawing back and forth to create clean, uniform slices. Remember, portion control is crucial. Aim for slices that are neither too thick, which can overwhelm the fillings, nor too thin, which may not hold up to the sandwich ingredients.
For presentation ideas, consider cutting the Turkish bread into different shapes like diagonal cuts for a stylish touch or into smaller portions for bite-sized sandwiches. Additionally, you can toast the slices slightly for added texture and flavor.
Mastering the art of bread slicing will elevate the quality of your sandwiches and impress your guests with every bite.
Filling Your Sandwiches
Consider experimenting with a variety of fresh ingredients to create delicious and satisfying fillings for your Turkish bread sandwiches. When it comes to sandwich variations, the options are endless, allowing you to customize your fillings to suit your preferences.
Here are some ideas to inspire your culinary creations:
- Mediterranean Delight: Fill your Turkish bread with succulent grilled chicken, creamy hummus, fresh cucumbers, juicy tomatoes, tangy feta cheese, and a sprinkle of fragrant oregano. This combination offers a burst of flavors that will transport you to the sunny shores of the Mediterranean.
- Classic Italian: For a taste of Italy, layer your bread with savory salami, peppery arugula, sun-dried tomatoes, rich mozzarella cheese, and a drizzle of balsamic glaze. This timeless combination is perfect for those who appreciate a hearty and flavorful sandwich.
- Veggie Lover's Dream: If you prefer a vegetarian option, consider filling your Turkish bread with grilled eggplant, roasted bell peppers, marinated artichoke hearts, fresh spinach, creamy avocado slices, and a dollop of pesto. This filling isn't only nutritious but also bursting with vibrant colors and textures to please your taste buds.
With these suggestions, you can play around with different ingredients and textures to create sandwiches that cater to your sandwich variations and bread texture preferences.
Serving and Storing
Guarantee your Turkish bread sandwiches are served fresh and stored properly to maintain their delicious taste and texture. When it comes to serving, presentation is key. Consider cutting your Turkish bread sandwiches into visually appealing shapes like triangles or squares for a more sophisticated look. You can also elevate the serving presentation by adding a variety of colorful garnishes such as fresh herbs, cherry tomatoes, or pickles on the side. These simple touches can enhance the overall dining experience and impress your guests.
For storing your Turkish bread sandwiches, follow these storage tips to keep them tasting their best. To maintain freshness, wrap the sandwiches tightly in plastic wrap or aluminum foil. Alternatively, you can store them in an airtight container in the refrigerator for up to 2-3 days. If you plan on keeping them for longer, consider freezing the sandwiches. Simply wrap them in freezer-safe packaging and they can be stored for up to a month. When ready to eat, just thaw them in the refrigerator overnight and reheat in an oven or toaster oven for a crispy finish.
Experiment with different sandwich variations using your Turkish bread. Try fillings like grilled vegetables, chicken shawarma, or falafel for a Mediterranean twist. If you're looking for bread alternatives, consider using pita pockets or lavash bread to switch things up. These alternatives can bring new flavors and textures to your sandwiches, keeping your meals exciting and diverse.
Frequently Asked Questions
Can I Freeze the Turkish Bread Loaves for Later Use?
You can freeze Turkish bread loaves for later use to extend their shelf life. Proper bread storage is key to maintaining freshness.
When freezing, wrap the loaves tightly in plastic wrap or aluminum foil, then place them in a freezer-safe bag to prevent freezer burn.
When ready to use, thaw the bread at room temperature or in the oven. This way, you can enjoy your favorite bread recipes and sandwich fillings anytime.
How Do I Know When the Dough Has Risen Enough?
To determine if your dough has risen enough, gently press two fingers into the dough. If the indentations remain, it's ready. The dough should have doubled in size and feel airy.
Check readiness by observing its size and elasticity. Confirm that the dough consistency is smooth and elastic to guarantee a successful rise. Keep an eye on the texture; it should be soft and pliable.
Trust your instincts and experience to judge when the dough is perfectly risen.
Can I Substitute All-Purpose Flour With Whole Wheat Flour?
You can substitute all-purpose flour with whole wheat flour in your Turkish bread recipe. Baking tips include adjusting the liquid content slightly, as whole wheat flour tends to absorb more moisture.
This swap can add nutritional benefits like increased fiber and protein. The flavor may have a nuttier taste, and the texture might be denser compared to using all-purpose flour.
Experiment with different ratios for unique flavor variations and find the perfect balance for your sandwich bread.
What Can I Use if I Don't Have a Baking Stone?
If you don't have a baking stone, fear not! There are alternative baking methods you can try.
Get creative with makeshift tools like an overturned cast-iron skillet or a heavy-duty baking sheet. Preheat these items in the oven to mimic the effects of a baking stone.
These baking stone alternatives are effective and can help achieve that perfect crust you desire. Experiment and find creative solutions that work best for your bread-making process.
How Long Can I Store the Turkish Bread Before It Goes Bad?
When it comes to Turkish bread, the shelf life depends on how you store it. To maintain freshness and preserve its quality, make sure you store it in an airtight container or sealed bag at room temperature.
Typically, Turkish bread can last up to 2-3 days if stored properly. For longer storage, consider freezing it for up to 3 months, making sure it's tightly wrapped. This method helps extend its shelf life without compromising taste.
Conclusion
You've just mastered the art of making Turkish bread for sandwiches. With its fluffy texture, golden crust, and delicious flavor, your homemade loaves are sure to impress.
Now all that's left to do is fill them with your favorite ingredients and enjoy a delicious sandwich that will transport you straight to the streets of Turkey.
Happy baking and happy eating!


