Tantalize your senses with the secrets of baking authentic Turkish bread at home, and discover the key to achieving bakery-quality results.
 Add to Recipe Book
You’ve always admired the aroma and taste of authentic Turkish bread but wondered how to recreate it in your own kitchen. Imagine the satisfaction of pulling out a golden-brown loaf, perfectly crusty on the outside and soft on the inside. The process may seem intricate, but with the right guidance, you can master the art of making Turkish bread at home. Let’s start this culinary journey together and uncover the secrets to achieving bakery-quality results in your own oven.
Ingredients Needed
To create authentic Turkish bread at home, you’ll need to gather high-quality ingredients that are essential for achieving the perfect flavor and texture. Turkish cuisine is renowned for its unique blend of flavors and textures, and the key to replicating this in your homemade bread lies in the ingredients you use.
When it comes to baking techniques, Turkish bread is characterized by its soft interior and slightly chewy crust, achieved through specific ingredients and methods.
Start by selecting the finest quality flour for your Turkish bread. Opt for a high-protein bread flour to guarantee the ideal structure and texture. Yeast is another vital component in Turkish bread. Use active dry yeast for a reliable rise and traditional flavor. Salt not only enhances the taste but also regulates the fermentation process, so be sure to use a good quality salt.
Olive oil is a staple in Turkish cuisine and adds richness to the bread. Incorporating olive oil into the dough will result in a softer crumb and a delicious aroma. Water is the final essential ingredient, and its quality can significantly impact the final product. Use filtered or spring water for the best results in your Turkish bread.
Preparing the Dough
Now it’s time to get your hands in the dough!
Begin by mixing the ingredients thoroughly until a smooth consistency forms.
Next, knead the dough until it becomes elastic and no longer sticky.
Mixing the Ingredients
Begin by combining the flour, yeast, salt, and water in a large mixing bowl, using a gentle folding motion to incorporate the ingredients evenly. The dough consistency should be smooth and elastic, slightly sticky but not wet. This guarantees a perfect base for your Turkish bread.
Experiment with flavor variations by adding ingredients like sesame seeds, nigella seeds, or even a sprinkle of sumac for a unique twist. Allow the dough to proof for at least an hour in a warm, draft-free place. This resting time helps develop the flavors and texture of the bread.
When shaping the dough, try traditional techniques like rolling it into elongated ovals or rounds. The shaping not only affects the appearance but also influences the final texture of the bread. Remember to cover the dough with a damp cloth or plastic wrap during the proofing time to prevent it from drying out.
Mastering these steps will lay a solid foundation for creating authentic Turkish bread at home.
Kneading the Dough
Start by gently massaging the dough on a clean, lightly floured surface for about 10-15 minutes until it becomes smooth and pliable. The consistency you’re aiming for is a soft and slightly tacky dough that holds its shape but is not too stiff. During this process, you can incorporate different flour types such as all-purpose flour or bread flour to achieve the desired texture.
When kneading the dough, there are various shaping techniques you can use to develop gluten and create a light and airy bread. One method is the fold-over technique where you fold the dough in half towards you and then push it away with the heels of your hands. This helps trap air inside the dough, leading to a better rise and texture. Another technique is the stretching and folding method, where you stretch the dough out into a rectangle, fold it in thirds like a letter, and then repeat the process a few times.
To give you a clearer idea, here’s a table outlining different flour types and kneading styles:
| Flour Types | Kneading Styles |
|---|---|
| All-Purpose | Fold-over Technique |
| Bread Flour | Stretching and Folding |
| Whole Wheat | Circular Motion |
| Rye | Slap and Fold Technique |
These methods, coupled with the right flour choice, will result in an authentic Turkish bread that is not only delicious but also reflects the true essence of Turkish cuisine.
Allowing Dough to Rise
To prepare the dough for rising, cover it with a clean kitchen towel in a warm, draft-free spot, allowing it to double in size for about 1-2 hours. The rising time is essential to achieve the light and airy texture characteristic of authentic Turkish bread. Confirm the dough consistency is smooth and elastic before letting it rise, as this will help in creating a well-structured loaf.
Place the covered dough in an area with a consistent room temperature, ideally around 75-80°F (24-27°C). This temperature range is best for yeast activation and fermentation, aiding in the development of flavor and texture. Avoid placing the dough in a cold or overly warm spot, as this can affect the rising process.
During the rising period, refrain from disturbing the dough to allow the yeast to work its magic. The dough should visibly double in size, indicating that it’s ready for the next steps in the bread-making process. Remember, patience is key when allowing the dough to rise for that perfect Turkish bread experience.
Kneading and Resting the Dough
With the prepared dough in your hands, it’s time to knead it to develop the gluten structure and allow it to rest for the best texture and flavor in your homemade Turkish bread. Start by ensuring the dough consistency is slightly tacky but not overly sticky. You can adjust by adding a little more flour if needed.
To begin kneading, place the dough on a lightly floured surface. Use the heels of your hands to push the dough away from you, then fold it back over itself. Rotate the dough a quarter turn and repeat. Knead for about 10-15 minutes until the dough becomes smooth, elastic, and springs back when poked.
As you knead, remember these tips: apply even pressure, avoid adding too much flour, and be patient as the gluten develops. Once kneaded, shape the dough into a smooth ball and place it in a lightly greased bowl. Cover it with a damp cloth or plastic wrap and let it rest in a warm, draft-free place for about 1-2 hours until it doubles in size. This resting period allows the flavors to develop and the dough to relax, making it easier to shape later on.
After the resting time, your dough is ready to be shaped into the traditional Turkish bread rounds before baking.
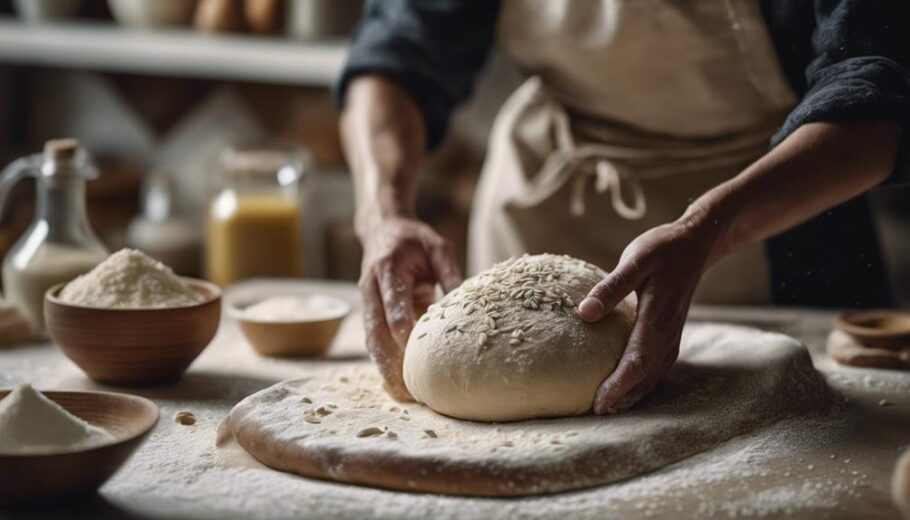
Shaping the Bread
Now that your dough has rested, it’s time to shape your Turkish bread to perfection. Start by employing specific techniques to prepare your dough for shaping, ensuring the ideal texture and consistency.
From rolling and folding to the final steps of shaping, each movement contributes to the authentic look and taste of your homemade Turkish bread.
Dough Preparation Techniques
Shape the Turkish bread dough by gently stretching and folding it into your desired form, ensuring a smooth and uniform surface.
Start by selecting the right flour type for your recipe, whether it’s all-purpose flour, bread flour, or a mix of both. Consider different proofing methods like a long, slow rise in the refrigerator for enhanced flavor development.
When choosing yeast options, you can use active dry yeast, instant yeast, or fresh yeast based on availability and personal preference. Each type may require slightly different proofing times, so adjust accordingly.
Experiment with baking techniques such as baking the bread on a preheated stone for a crispier crust, or using steam in the oven for a chewier texture.
Ensure your dough is well-kneaded before shaping to develop gluten properly, giving the bread structure and elasticity.
Take your time shaping the dough, whether for traditional round loaves or elongated baguettes, to create an authentic Turkish bread experience at home.
Rolling and Folding
To create the perfect shape for your Turkish bread, gently roll and fold the dough with precision and care. When shaping your dough, remember that the way you handle it can greatly impact the final texture and appearance of your bread.
Here are some key tips to help you master the art of rolling and folding:
- Rolling Techniques: Start by gently pressing the dough into a rectangular shape with your hands. Then, using a rolling pin, begin rolling the dough outwards from the center in even strokes. Rotate the dough occasionally to make sure it maintains an even thickness throughout.
- Folding Methods: After rolling out the dough, you can create layers by folding the dough in thirds, like a letter. This technique helps trap air within the layers, resulting in a lighter and fluffier bread.
- Dough Handling and Shaping Tricks: To prevent sticking, lightly flour your work surface and rolling pin. Be gentle when handling the dough to avoid deflating it, especially if it’s been proofed. Additionally, shaping the dough into a tight ball before rolling it out can help achieve a more uniform shape in the final bread.
Final Shaping Steps
Start by gently tucking and shaping the dough to achieve the desired form for your Turkish bread. After the dough has been rolled and folded, shaping plays a pivotal role in the final appearance and texture of the bread. For Turkish baking, traditional shapes like round loaves or elongated ovals are commonly used.
To enhance the crust development, you can create intricate patterns on the surface of the dough through bread scoring. This step not only adds an aesthetic touch but also helps control the expansion of the bread during baking. In Turkish traditions, these patterns can vary from simple slashes to more elaborate designs, each contributing to the overall presentation of the bread.
When shaping the dough, make sure that it’s smooth and taut, with no visible seams or air pockets. This will help the bread maintain its structure while baking, resulting in a beautifully risen loaf with a golden crust.
Embrace the art of shaping to elevate your homemade Turkish bread to an authentic culinary delight.
Baking the Bread
Get your oven preheated to 450°F to ensure it’s at the correct temperature for baking the authentic Turkish bread. Here’s how to make sure your bread turns out just right:
- Adjust Baking Temperature: For a crispy crust and soft interior, it’s essential to maintain the correct baking temperature. If your bread is browning too quickly or not enough, try adjusting the oven temperature slightly. A hotter oven can help achieve a darker crust, while a cooler oven can prevent burning.
- Choose the Right Flour: The type of flour you use can greatly impact the texture and flavor of your Turkish bread. Opt for high-protein bread flour for a chewier texture or mix in some whole wheat flour for a nuttier taste. Experiment with different flour blends to find the perfect combination for your preferred bread consistency.
- Monitor Dough Hydration Levels: The hydration level of your dough affects the final texture of the bread. A wetter dough can result in a more open crumb structure, while a drier dough produces a denser loaf. Adjust the hydration levels by adding more water or flour during kneading to achieve the desired consistency.
With your oven at the correct temperature, the perfect flour blend, and ideal dough hydration, your authentic Turkish bread is on its way to baking perfection.
Achieving That Authentic Texture
To achieve that authentic Turkish bread texture, focus on kneading the dough to perfection.
The key lies in creating a smooth and elastic dough through proper kneading techniques.
This process helps develop the gluten, resulting in the ideal chewy yet soft texture characteristic of Turkish bread.
Texture Is Key
Achieving that authentic texture in your homemade Turkish bread is crucial for capturing the true essence of this traditional recipe. To guarantee texture perfection and a delightful bread crust, pay attention to the following details:
- Texture Perfection:
The key to attaining the ideal texture in your Turkish bread lies in the dough consistency. Aim for a soft, elastic dough that’s slightly sticky to the touch but doesn’t cling excessively to your hands. This texture will result in a light and airy crumb once baked.
- Bread Crust:
To achieve a crispy and flavorful crust, consider brushing your bread with a light egg wash before baking. This technique not only enhances the visual appeal of your bread but also adds a subtle sheen and crunch to the crust.
- Flavor Infusion:
Experiment with different baking techniques such as baking the bread on a pizza stone or using steam in the oven. These methods can help infuse your Turkish bread with added flavor and create a more authentic taste reminiscent of traditional Turkish bakeries.
Tips for Kneading
Utilize gentle yet firm hand movements during kneading to develop the desired gluten structure for that authentic Turkish bread texture. When kneading the dough, focus on folding, pressing, and stretching the dough to encourage gluten development. This process helps create the characteristic chewy texture of Turkish bread. To master kneading techniques, start by lightly flouring your work surface to prevent sticking.
Place the dough on the floured surface and fold it over towards you. Use the heels of your hands to gently push the dough away, then give it a quarter turn and repeat. Continue this process for about 10-15 minutes or until the dough is smooth and elastic.
If you encounter any issues during kneading, such as the dough feeling too sticky or tough, adjust the consistency by adding small amounts of flour or water accordingly. Consistency is key in achieving the perfect texture, so pay attention to the dough’s feel throughout the kneading process. Effective time management is also essential; make sure you allocate sufficient time for kneading to develop the gluten adequately.
Tips for a Perfect Bake
For a perfect bake of authentic Turkish bread at home, make sure your oven is preheated to the correct temperature. This step is essential to achieve that golden-brown crust and soft interior characteristic of Turkish bread.
Here are some necessary tips to help you master the art of baking this delightful bread:
- Proper Steam Injection: To achieve a crispy crust, create steam in the oven during the first few minutes of baking. You can do this by placing a pan of hot water on the bottom rack or by spraying water into the oven. The steam helps the bread rise properly and gives it a beautiful shine.
- Right Baking Time: Turkish bread should be baked until it reaches a deep golden color. Be sure to follow the recommended baking time closely, as underbaking can result in a doughy texture, while overbaking can make the bread dry.
- Cooling Process: Once the bread is out of the oven, resist the temptation to slice it immediately. Allow the bread to cool on a wire rack for at least 15-20 minutes. This resting period helps the bread finish cooking with residual heat and guarantees a perfect texture when sliced.
Serving Suggestions
Consider enhancing the dining experience by presenting your freshly baked Turkish bread alongside a selection of traditional Mediterranean dips and spreads. When it comes to Turkish bread plating, opt for a large wooden board or a rustic ceramic platter to showcase your bread beautifully. Sprinkle some sesame or nigella seeds on top for an extra touch of authenticity.
For Turkish bread pairing, you can’t go wrong with classic choices like hummus, baba ghanoush, and tzatziki. These creamy and flavorful dips complement the chewy texture and slightly crispy crust of the Turkish bread perfectly. If you’re feeling adventurous, try a spicy muhammara or a tangy cacik for a twist on the traditional pairings.
To elevate your Turkish bread platter, add some marinated olives, fresh cherry tomatoes, cucumber slices, and feta cheese cubes. The combination of flavors and textures will create a harmonious Mediterranean feast that will surely impress your guests.
When serving, tear the Turkish bread into manageable pieces rather than slicing it with a knife. This not only adds to the communal dining experience but also allows everyone to enjoy the rustic charm of tearing into warm, freshly baked bread.
Enjoy your Turkish bread alongside these delicious dips and spreads for a truly authentic and satisfying meal.
Storing Leftovers
Store any leftover Turkish bread in an airtight container or resealable plastic bag to maintain its freshness and prevent it from drying out.
Here are some tips to make the most out of your leftover Turkish bread:
- Freezing Options: If you have a large batch of Turkish bread leftover, consider freezing it for longer preservation. Slice the bread into manageable portions and wrap them tightly in plastic wrap before placing them in a freezer-safe bag. Frozen Turkish bread can last for up to three months. When ready to eat, simply thaw the bread at room temperature or warm it up in the oven for a few minutes.
- Reheating Methods: To revive day-old Turkish bread, sprinkle some water on its surface and heat it in a preheated oven at 350°F for 5-10 minutes. Alternatively, you can wrap the bread in foil and warm it in a skillet over low heat. This will help restore its crustiness and freshness.
- Sharing with Friends, Creative Uses: Don’t hesitate to share your extra Turkish bread with friends and family. It can be a delightful addition to a shared meal or as a gift. You can also get creative with your leftovers by turning them into breadcrumbs for coating meats, making croutons for salads, or creating a flavorful base for dishes like bread pudding.
Enjoying Your Homemade Turkish Bread
Enhance your culinary experience by savoring the freshly baked aroma and delightful texture of your homemade Turkish bread. To fully enjoy your bread, consider storing it correctly. Turkish bread is best stored in a paper bag at room temperature for up to 2-3 days. Avoid refrigeration as it can make the bread lose its softness and flavor.
If you need to store it longer, freezing is an option. Simply wrap the bread in foil and place it in a freezer bag. To enjoy your bread after freezing, let it thaw at room temperature and then warm it in the oven for a few minutes to regain its freshness.
When it comes to serving your Turkish bread, remember the importance of etiquette. Tear the bread into smaller pieces rather than cutting it with a knife, as this is the traditional way of serving Turkish bread. This action symbolizes hospitality and friendship.
To elevate your dining experience, serve your bread with flavorful dipping sauces like hummus, tzatziki, or baba ghanoush. You can also enjoy it with traditional Turkish spreads such as ezme (spicy tomato dip) or haydari (yogurt and herb dip). These condiments will complement the taste of your homemade Turkish bread and make your meal even more delightful.
Frequently Asked Questions
Can I Use All-Purpose Flour Instead of Bread Flour?
Yes, you can use all-purpose flour instead of bread flour for your Turkish bread. The flour substitution won’t significantly impact the rising process.
However, to enhance the fluffiness of the bread, consider adding a bit more yeast and allowing for a longer rising time.
When shaping the dough, make sure a smooth surface before baking on a hot surface like a pizza stone for that authentic Turkish bread texture.
How Do I Know When the Dough Has Risen Enough?
To know when the dough has risen enough, check the consistency—it should have doubled in size and be puffy. This usually takes about 1-2 hours at room temperature. Make sure the area is warm for proper yeast activation.
Press two fingers into the dough; if the indent remains, it’s ready. Don’t rush the rising process; it’s essential for the bread’s texture.
Pay attention to these details for delicious Turkish bread.
Can I Bake the Bread on a Pizza Stone?
You can definitely bake Turkish bread on a pizza stone. It’s a great way to achieve a crispy crust and even heat distribution.
Make sure to preheat the stone for about 30 minutes. If you don’t have all-purpose flour, you can use bread flour as a substitute for that authentic Turkish taste.
Your bread will turn out delicious with these baking techniques and flour substitutes. Enjoy the process and the amazing aroma filling your kitchen!
How Can I Make the Bread Extra Fluffy?
To make the bread extra fluffy, consider using instant yeast for a quicker rise or active dry yeast for a longer fermentation process.
Guarantee proper proofing by letting the dough rise in a warm environment until doubled in size.
When baking, create steam in the oven by adding a pan of water to enhance moisture and promote a soft, airy texture.
These yeast options and baking techniques will help you achieve that perfect fluffy Turkish bread at home.
Can I Freeze the Dough for Later Use?
Yes, you can freeze the dough for later use as part of your baking schedule. Freezing options provide the flexibility for long term storage, ensuring you always have fresh dough on hand.
To freeze the dough properly for best results, follow these steps:
Shape the dough into individual portions, wrap tightly in plastic wrap, then place in a freezer-safe bag.
When ready to bake, simply thaw in the refrigerator overnight before using.
Conclusion
Now that you have mastered the art of making authentic Turkish bread at home, you can enjoy the delicious flavors and aromas of this traditional bread anytime you like.
With just a few simple ingredients and some patience, you can create a beautiful loaf that’s perfect for serving with your favorite meals or enjoying on its own.
So roll up your sleeves, get baking, and savor the taste of homemade Turkish bread!


