Tantalize your taste buds with a simple baklava recipe that promises flaky layers and rich flavors – discover the secrets here!
 Add to Recipe Book
If you're looking to impress with a delectable dessert, mastering a simple baklava recipe can be a game-changer. Starting with a few basic ingredients and a step-by-step process, you'll soon be on your way to creating a sweet and nutty treat that's sure to delight your taste buds. But what's the secret to achieving that perfect flaky texture and rich flavor profile? Stay tuned to uncover the key tips and tricks that will set your baklava apart from the rest.
Ingredients for Baklava
To create delicious baklava, gather high-quality ingredients such as phyllo dough, nuts, sugar, butter, and spices. When it comes to nut options for baklava, the most common choice is a mix of walnuts, pistachios, and almonds. However, feel free to experiment with your favorite nuts or a combination that suits your taste. Toasting the nuts before using them in the baklava enhances their flavor and guarantees a crunchy texture in the final dish.
For sweetness levels, the traditional baklava recipe calls for a generous amount of sugar in the syrup that soaks the pastry after baking. If you prefer a less sweet dessert, consider reducing the sugar in the syrup or using a lighter hand when applying it to the baked baklava. Flavor variations can be introduced by adding spices like cinnamon, cardamom, or cloves to the nut mixture. These spices not only impart a lovely aroma but also add depth to the overall taste of the baklava.
When it comes to baking techniques, layering the phyllo dough with a nut mixture and butter is key to achieving the characteristic flaky texture of baklava. Brush each layer of phyllo generously with melted butter to maintain a crispy and golden-brown finish. Remember to cut the baklava into portions before baking to make serving easier once it's out of the oven.
Choosing the Right Phyllo Dough
When selecting phyllo dough for your baklava, consider the thickness of the sheets – thicker phyllo dough is easier to work with for beginners.
Additionally, you'll need to decide between fresh and frozen phyllo dough – fresh phyllo dough tends to be more delicate but can result in a crispier baklava, while frozen phyllo dough is more convenient.
Choose wisely based on your baking skills and preferences.
Phyllo Dough Thickness
Selecting the appropriate thickness of phyllo dough is crucial when preparing baklava as it significantly impacts the texture and overall success of your dessert. Phyllo dough typically comes in varying thicknesses, with the most common being either #4 or #7.
The thickness of the phyllo dough affects the final texture of your baklava, with thinner sheets creating a lighter and crispier result, while thicker sheets yield a more substantial and chewier texture.
When storing phyllo dough, make sure it's sealed well to prevent drying out, as dry phyllo dough can be challenging to work with and may result in a brittle baklava.
Different brands of phyllo dough may offer varying thicknesses and textures, so it's worth experimenting to find the one that best suits your preferences.
If phyllo dough isn't available, alternatives like puff pastry or even homemade dough can be used, though the texture and taste will differ slightly from traditional baklava.
Fresh Vs. Frozen
Consider the advantages and disadvantages of using fresh versus frozen phyllo dough to ensure the best outcome for your baklava recipe.
When comparing taste, fresh phyllo dough typically yields a more delicate and flaky texture than frozen dough. The freshness of the dough can enhance the overall flavor of the baklava, providing a superior experience for your taste buds.
On the other hand, frozen phyllo dough can be a convenient option for those looking to save time and effort in the kitchen. The convenience factor of having pre-made, frozen dough readily available can be a major time-saver for busy home cooks.
While fresh phyllo dough may require more delicate handling due to its fragile nature, the end result is often worth the extra care. Frozen dough, although convenient, may not achieve the same level of flakiness and lightness that fresh dough can offer.
Ultimately, the choice between fresh and frozen phyllo dough depends on your priorities regarding taste, convenience, and the time you're willing to invest in creating the perfect baklava.
Making the Nut Filling
Need advice on creating the perfect nut filling for your baklava? When it comes to making the nut filling, it's important to pay attention to a few key factors to make sure your baklava turns out delicious. Here are some tips to help you master the nut filling:
- Nut Selection: Choose high-quality nuts for your baklava filling. A combination of walnuts, pistachios, and almonds works well, providing a variety of flavors and textures.
- Mixing Process: Grind the nuts coarsely to maintain some texture in the filling. Avoid over-processing them into a fine powder as the crunchiness adds to the overall appeal of the baklava.
- Sweetness Level: Balance the sweetness of the nut filling with the sugar syrup that will be added later. Aim for a mildly sweet filling to prevent the baklava from becoming overly sugary.
- Nut to Phyllo Ratio: Guarantee an adequate amount of nut filling between each layer of phyllo dough. A good rule of thumb is to have a generous layer of nuts spread evenly across the phyllo sheets without making it too dense.
Assembling the Baklava Layers
Now, let's move on to assembling the baklava layers.
Start by gently layering the phyllo dough sheets one by one, brushing each with melted butter.
Sprinkle a generous amount of the nut mixture evenly between the layers to create a deliciously crunchy filling.
Layering the Phyllo Dough
Begin layering the phyllo dough sheets one by one, brushing each with melted butter as you go to create the flaky, delicious base of your baklava. Make sure each sheet is carefully placed to prevent air bubbles and achieve crispy edges.
Here are some tips to perfect your baklava layers:
- Even Layers: Aim for uniformity in layering the phyllo dough to guarantee a consistent texture throughout your baklava.
- Brushing Technique: Use a pastry brush to evenly distribute the melted butter over each phyllo sheet for that golden, crispy finish.
- Gentle Handling: Handle the delicate phyllo dough with caution to avoid tearing and maintain the integrity of the layers.
- Stacking Strategy: Alternate the direction of the phyllo sheets with each layer to create a sturdy structure and enhance the visual appeal of your baklava.
Adding the Nut Mixture
As you continue assembling your baklava layers, the next step is to generously sprinkle the nut mixture over the buttered phyllo sheets. The nut mixture placement is essential for guaranteeing that each bite of baklava has a perfect balance of flavors and textures. Begin by spreading a uniform layer of the nut mixture over the buttered phyllo sheet, making sure to reach the edges for even distribution.
When placing the nut mixture, make sure that it's spread consistently to ensure that every piece of baklava has an equal amount of nuts and spices. This uniform distribution enhances the overall taste and texture of the dessert. Press down gently on the nut mixture layer to secure it in place and prevent it from shifting when adding more phyllo layers on top.
Maintaining the nut mixture consistency throughout the baklava guarantees that each bite is a harmonious blend of crunchy nuts, sweet honey, and buttery phyllo dough. Continue layering the phyllo sheets, butter, and nut mixture following these steps until you have used all your ingredients, finishing with a final layer of butter on top.
Cutting the Baklava Before Baking
To ensure clean and precise cuts in your baklava before baking, use a sharp knife and gently score through the layers without pressing too firmly. This step is essential to guarantee that the baklava bakes evenly and allows the syrup to penetrate the layers effectively.
- Use a Sharp Knife: A well-honed knife will make it easier to cut through the delicate layers of phyllo dough without crushing them.
- Score Gently: Lightly score the baklava before baking by making shallow cuts. This will help you achieve neat slices once it's done.
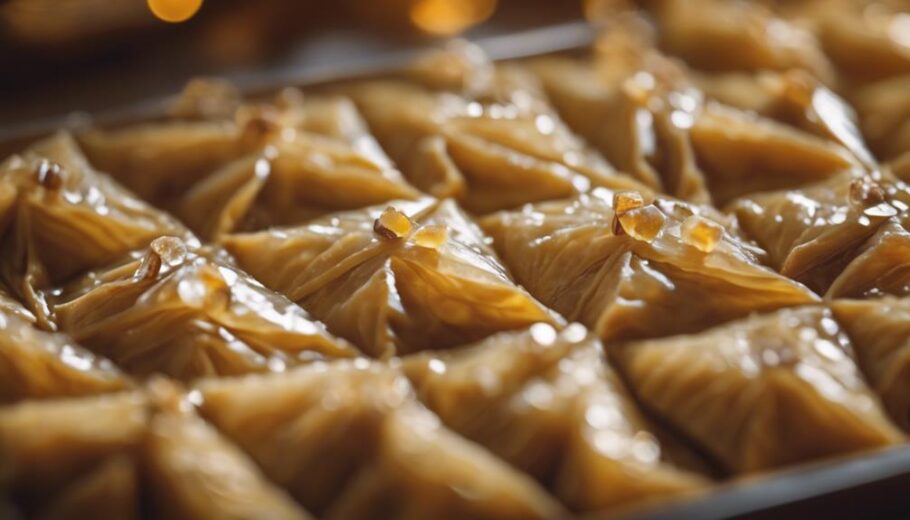
- Cutting Patterns: Consider cutting the baklava into diamond or square shapes for a traditional look or opt for rectangles for a modern twist.
- Even Slices: Aim for uniform cuts to ensure that each piece bakes evenly and presents beautifully on a serving platter.
Properly cutting the baklava before baking not only enhances its visual appeal but also plays a role in its overall texture and taste. By following these tips, you'll set the stage for a perfectly baked baklava that will impress your guests with its professional presentation.
Preparing the Syrup
To prepare the syrup for your baklava, gather your ingredients such as sugar, water, honey, and a touch of lemon juice.
Begin by boiling the mixture until the sugar dissolves completely, creating a fragrant and sweet syrup.
Once boiled, allow the syrup to cool to room temperature before pouring it over your baked baklava for a deliciously sweet finish.
Syrup Ingredients Needed
Prepare a fragrant syrup by combining sugar, water, and a touch of aromatic spices in a saucepan over medium heat. To enhance the syrup flavor and achieve the perfect consistency, consider the following:
- Sugar Ratio: The amount of sugar used affects the sweetness of the syrup. Adjust the quantity based on your preference.
- Aromatic Spices: Cinnamon, cloves, or a hint of lemon can elevate the flavor profile of the syrup.
- Cooking Time: Simmer the mixture until the sugar dissolves completely and the syrup slightly thickens.
- Cooling Process: Allow the syrup to cool before pouring it over the baked baklava to prevent sogginess.
For syrup variations, experiment with different spices like cardamom or star anise for a unique twist.
When it comes to syrup storage, keep any leftover syrup in an airtight container in the refrigerator for up to two weeks. Proper storage guarantees that the syrup maintains its freshness and flavor for future baklava batches.
Boiling the Syrup
Begin by bringing the sugar, water, and chosen aromatic spices to a gentle boil in a saucepan over medium heat. As the mixture heats up, make sure the sugar dissolves completely by stirring constantly. This step is essential to achieve the desired syrup consistency for your baklava.
Once the sugar has dissolved, let the mixture simmer for about 10-15 minutes. During this time, the syrup will thicken slightly. Keep a close eye on it and continue stirring frequently to prevent burning or sticking to the pan. The syrup should coat the back of a spoon, indicating that it has reached the right consistency.
To test if the syrup is ready, you can also use a candy thermometer. The syrup should reach around 220°F (104°C), which is the ideal temperature for a thick and sticky syrup perfect for baklava.
Once you've achieved the desired consistency, remove the syrup from the heat and set it aside to cool slightly before pouring it over the baked baklava.
Cooling the Syrup
After achieving the desired syrup consistency, allow it to cool slightly before proceeding with the next steps in preparing your baklava. This step is important to make sure that the syrup sets properly and enhances the flavors of your baklava.
Here are some key points to keep in mind when cooling the syrup:
- Temperature Control: Make sure the syrup cools to lukewarm or room temperature before pouring it over the baked baklava. This helps prevent the pastry from becoming soggy.
- Flavor Absorption: Cooling the syrup allows the baklava to absorb the flavors effectively, resulting in a more delicious and aromatic dessert.
- Thickening: As the syrup cools, it will thicken slightly, providing a rich and indulgent texture to your baklava.
- Enhancing Syrup Flavor Profiles: The cooling process enhances the syrup's flavor profiles, allowing the sweetness to mellow and blend harmoniously with the nuts and pastry layers.
Pouring Syrup Over Baklava
To guarantee the baklava is perfectly sweet and moist, gently drizzle the warm syrup over the freshly baked layers. The consistency of the syrup plays an essential role in both the presentation and taste of your baklava. A syrup that's too thin may result in a soggy dessert, while a syrup that's too thick may not be absorbed properly, affecting the overall sweetness and texture of the baklava.
When pouring the syrup over the baklava, make sure that it's warm but not scalding hot. The warmth of the syrup helps it penetrate the layers, allowing for best absorption. Start by drizzling a small amount of syrup evenly over the baklava, making sure to cover the entire surface. Allow the baklava some time to absorb the syrup before adding more. This gradual process ensures that each layer soaks up the sweetness without becoming overly saturated.
As you pour the syrup, observe how it seeps into the baklava, enhancing its flavor and creating a delectable moistness. Proper syrup absorption is key to achieving the desired level of sweetness in every bite. Additionally, the way the syrup glistens on the baklava layers adds a beautiful sheen, enhancing the presentation of your homemade dessert.
Mastering the art of pouring syrup over baklava will elevate your baking skills and impress your guests with a delicious and authentic treat.
Baking the Baklava
When baking the baklava, make certain the layers are golden brown and crispy to achieve the perfect texture and taste. Baklava is a traditional Middle Eastern dessert made of layers of phyllo dough, nuts, and syrup.
Here are some essential tips to make sure your baklava turns out delicious:
- Check for Golden Brown Color: Keep an eye on the baklava while it's baking to verify the top layers turn a beautiful golden brown color. This color indicates that the phyllo dough has crisped up nicely.
- Crispy Layers: The key to a great baklava lies in achieving crispy layers. Make certain to brush each layer of phyllo dough with butter or oil generously to create that crisp texture.
- Even Baking: To make certain even baking, rotate the baking dish halfway through the cooking time. This step helps all parts of the baklava cook uniformly.
- Avoid Overbaking: Be cautious not to overbake the baklava, as this can result in a dry and tough texture. Remove the baklava from the oven once it's golden brown and the edges are slightly crispy.
Baklava has a rich history dating back to the Ottoman Empire and is commonly served on special occasions. Its presentation can vary from a simple square cut to intricate diamond shapes.
Once baked, proper storage in an airtight container at room temperature helps maintain its freshness and flavor for several days.
Letting Baklava Cool
Allow the freshly baked baklava to cool for at least an hour before proceeding with the next steps to make certain the layers set properly. Allowing baklava to cool is essential to guarantee that the syrup seeps into the layers effectively, creating that characteristic sweet and sticky texture. Rushing this step may result in a soggy or unevenly soaked baklava.
To help you keep track of the cooling time and achieve the best results, here's a simple time guide for letting your baklava cool properly:
| Time | Cooling Stage | Description |
|---|---|---|
| 0-30 minutes | Warm | Baklava is still hot from the oven. |
| 30-45 minutes | Lukewarm | Temperature is gradually decreasing. |
| 45-60 minutes | Slightly Warm | Baklava is getting close to room temperature. |
| 60+ minutes | Room Temperature | Baklava is completely cooled and ready for the next steps. |
Proper serving etiquette dictates that baklava should be served at room temperature for the best flavor and texture. The cooling process allows the flavors to meld together, resulting in a more delicious and cohesive dessert. Remember, patience is key when it comes to letting your baklava cool – it's worth the wait!
Serving and Enjoying Baklava
Once the baklava has cooled to room temperature, prepare to indulge in the delightful layers of nuts, buttery pastry, and sweet syrup. To truly enhance your baklava experience, consider the following tips:
- Baklava Presentation:
Present your baklava on a decorative platter to showcase its intricate layers.
Dust the top with a light sprinkling of finely chopped pistachios or a hint of edible gold leaf for a touch of sophistication.
- Baklava Pairings:
Serve the baklava with a side of traditional Turkish coffee or a cool cup of mint tea.
For a modern twist, pair it with a scoop of creamy vanilla ice cream for a delightful contrast of temperatures and flavors.
When it comes to storing your baklava for later enjoyment, remember these essential tips:
- Baklava Storage:
Store baklava in an airtight container at room temperature for up to one week to maintain its quality.
Alternatively, freeze individual pieces in a freezer-safe bag for longer storage, ensuring they're properly wrapped to prevent freezer burn.
Experiment with different variations of baklava by incorporating ingredients like different types of nuts, spices, or adding a drizzle of chocolate on top for a luxurious twist. Enjoy the process of serving and savoring this delectable treat in various creative ways.
Frequently Asked Questions
Can I Use a Different Type of Nuts in the Filling?
Yes, you can make nut substitutions in the filling to create different flavor variations.
When considering changing the type of nuts in your baklava, keep in mind that some nuts may have different textures and flavors, impacting the overall taste.
Experiment with alternatives like almonds, pistachios, or walnuts to personalize your baklava.
Remember to adjust quantities accordingly for the best results in your baklava recipe.
How Long Can I Store Baklava and How Should I Store It?
To keep baklava fresh, store it in an airtight container at room temperature. Proper storage will help maintain its quality and taste.
Baklava can last up to two weeks if stored correctly. Opt for containers that seal tightly, like Tupperware or metal tins, to prevent exposure to air and moisture.
Enjoy your delicious baklava within the recommended shelf life by following these storage tips.
Can I Make Baklava Without Using Butter?
Yes, you can make baklava without using butter by opting for dairy-free options. Instead of butter, you can use alternatives like vegan butter, coconut oil, or a blend of oils. These choices provide healthier alternatives while still achieving a similar rich flavor and flaky texture.
Experimenting with these substitutes can cater to dietary restrictions or preferences without compromising the delicious outcome of your baklava.
Is It Necessary to Use a Pastry Brush for Buttering Phyllo Dough?
When buttering phyllo dough, a pastry brush isn't mandatory. You can use alternatives like a clean paper towel or your fingertips to spread the butter evenly.
If looking for a butter substitution, consider using melted ghee or a light olive oil spray for a similar effect.
Experiment with different methods to find what works best for you when making baklava or other dishes with phyllo dough.
Can I Freeze Baklava Before or After Baking?
You can freeze baklava both before and after baking.
If freezing before baking, assemble the baklava, wrap it tightly in plastic wrap and foil to prevent freezer burn. When ready to bake, allow it to thaw in the fridge overnight, then bake as usual.
If freezing after baking, let the baklava cool completely, then wrap it well in plastic wrap and foil. Thaw at room temperature before serving.
Conclusion
To sum up, making baklava is a rewarding and delicious experience for beginners. By following the simple steps of layering phyllo dough with a nut mixture, baking to a golden brown, and pouring warm syrup over the finished product, you can create a sweet and impressive dessert that will impress your friends and family.
With practice and attention to detail, you can master the art of making baklava and enjoy the rich flavors and textures it has to offer.


